Class Rosters
Please email [email protected] with any questions.


Please email [email protected] with any questions.
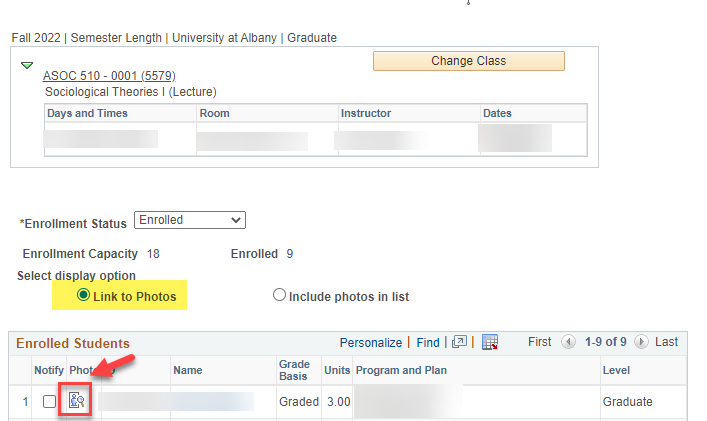
Your class roster will show you the enrollment capacity and the number of students currently enrolled, as well as each student’s ID number, name, grade basis, units, program and plan, and level.
To print your Class Roster, select “Printer Friendly Version.”
To download your Class Roster as an Excel file, select the Download icon. (The icon is a square made of small white boxes with a red arrow in the top right corner.)
Please check your class roster to ensure only students who are registered for your course are attending classes.
Students may be deregistered from courses for a variety of reasons. Students may also choose to drop or withdraw from courses.
Note: Students’ vaccination statuses and reasons for withdrawing are private. This information should not be discussed in class.
Do not allow students who are not registered for your course to attend class, take quizzes or exams, or submit assignments. Additionally, don’t manually add students who are not registered for your course to your Brightspace course.
To check your students’ enrollment status, follow the instructions above to access your class roster and then select the enrollment status “Enrolled.” This will display all students who are enrolled and withdrawn.
Take note of how many students are enrolled, using the scrolling arrows to see all of your roster’s pages. Only students whose status is “enrolled” should be participating in your course.
If you select the enrollment status “All,” it will also display students who dropped the course before the Academic Calendar deadline for dropping a course without receiving a Withdrawn (W) grade.
If students have questions about their registration status, please refer them to the Registrar’s Office ([email protected]).
Once you’ve opened your class roster, click the box in the “Notify” column for the student(s) you want to email.
Click the “Notify Selected Students” button.
Leave your email address in the “To” field, so you will receive a copy of the email. To protect students’ privacy, as required by FERPA, students’ email addresses will be automatically placed in the “BCC” field.
Enter the appropriate information in the “Subject” and “Message Text” fields.
Use the Spell Check icon to check your message. (The icon is a blue book with a checkmark over it.)
When you are ready to send your message, click the “Send Notification” button.
Click “Return to Class Roster” to go back to the roster.
Once you’ve opened your class roster, click the “Notify All Students” button.
Leave your email address in the “To” field, so you will receive a copy of the email. To protect students’ privacy, as required by FERPA, students’ email addresses will be automatically placed in the “BCC” field.
Enter the appropriate information in the “Subject” and “Message Text” fields.
Use the Spell Check icon to check your message. (The icon is a blue book with a checkmark over it.)
When you are ready to send your message, click the “Send Notification” button.
Click “Return to Class Roster” to go back to the roster.
Open your class roster and click on the Photo icon to the left of the student’s ID Number. (The icon is a magnifying glass over a cartoon photograph.)
Open your class roster and select the “Include Photos in List” radio button in the display options.
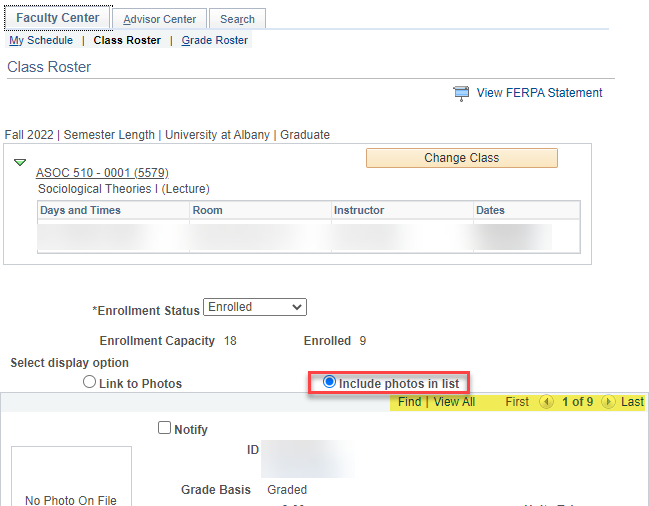
The view will default to the first student in your roster. To view more than one student, select “View All” from the blue divider bar above the student’s profile.
If you have more than 100 students on your roster, only the first 100 will display. Click the Show Next Row icon to view additional students. (The icon is a white box with a blue triangle pointing to the right.)