

Enrollment Requirement Groups
Enrollment requirement groups assist in managing enrollment in classes and reserving seats for a select population of students. Registration can be managed based on the following requirements:
- Prerequisites and/or co-requisites
- Specific majors and/or minors
- Academic level (for example: freshmen)
- Admission type (for example: transfer students)
- Student groups (for example: international students or Living-Learning Community residents)
Enrollment requirement groups can be applied at three levels:
enrollment-requirement-groups
Catalog level
Catalog level
All students in every section of a class must meet the requirement group to enroll.
Catalog level restrictions must match course descriptions listed in the Undergraduate and Graduate Bulletins.
Section level
Section level
All students in a particular section of a class must meet the requirement group to enroll.
Note: Departments must ask the Registrar's Office to apply requirement groups at the section level during initial scheduling.
Reserve level
Reserve level
A specific number of seats can be held in a particular section of the class for a select population of students.
Note: Departments manage enrollment requirement groups at the reserve level. Please do not assign or adjust enrollment requirement groups at the reserve level for fall and spring semesters until notified by the Registrar's Office.
See the Reserves section for more information.
PeopleSoft checks enrollment requirement groups in the following order:
- Catalog level
- Section level
- Reserve level
The Registrar’s Office manages enrollment requirement groups. To request a list of existing enrollment requirement groups, please email [email protected].
Enrollment Requirement Groups Request
Enrollment Requirement Groups Request
Academic departments must submit a Scheduling Form to request changes to existing enrollment requirement groups, or to request that a new one be created.
If you are requesting a new enrollment requirement group, please answer the following questions in your email:
- What requirement is being applied?
- What catalog subject and course number should the requirement be applied to?
- Should the requirement apply to all class sections or just one?
- Should the requirement apply to a specific number of seats in the class or to all seats?
Please also keep this information in mind:
- Pre-requisite and co-requisite checking should be applied as a requirement group at the catalog level.
- If the requirement changes, the academic department must notify the Registrar’s Office during the initial scheduling period so we may build, adjust and test the group
- Class permission will override enrollment requirements groups at the section, catalog and reserve levels.
- An enrollment requirement group can check for requisites during registration, instead of using class permission to regulate enrollment.
Enrollment Requirement Group Query
Enrollment Requirement Group Query
To assist in efforts to manage enrollment requirement groups, departmental schedulers can run this query: UASR_CLASSES_SUBJ_REQ_GRP_NOTE.
This query reviews all scheduled classes by academic subject for a term and the enrollment requirement groups that are applied at the catalog and section levels for those classes.
- Log into PeopleSoft. Then, use the Main Menu to navigate to “Query Manager.” (Your path will be “Reporting Tools,” then “Query,” then “Query Manager.”
- Then, run this query: UASR_CLASSES_SUBJ_REQ_GRP_NOTE
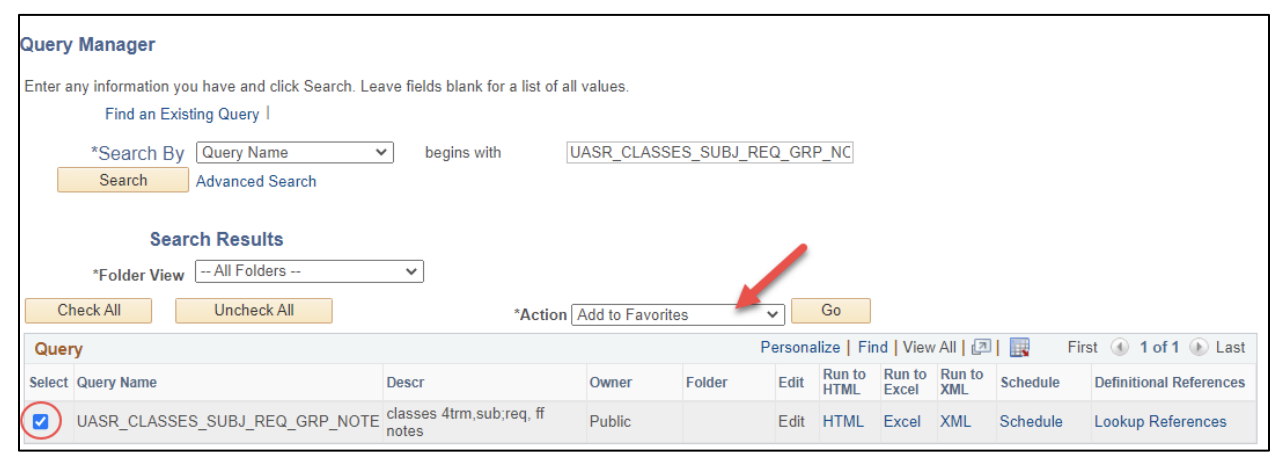
We highly recommend saving the query to your favorites for repeat access in the future. To do so, check the radio button next to the query, choose the “Add to Favorites” action and select “Go.”
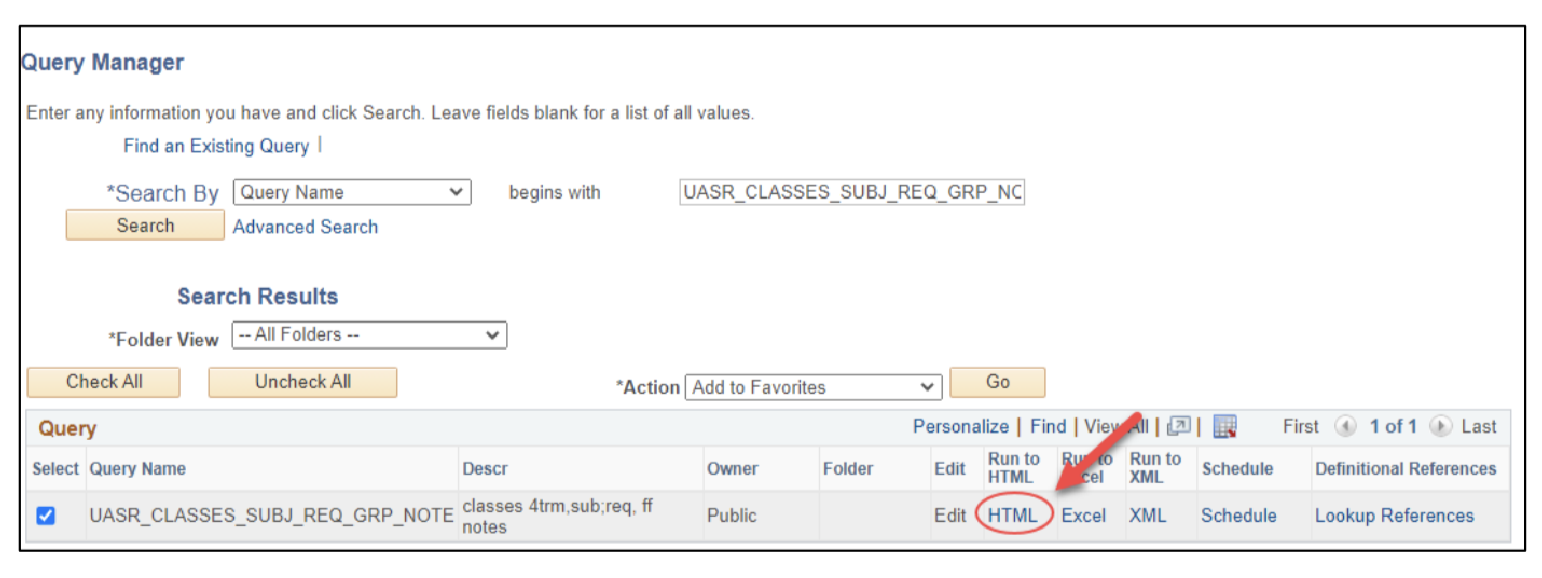
We recommend running the query to HTML.
You may use the magnifying glass (located next to the prompts) to identify the information needed to successfully run the query.

This query will allow you to identify enrollment requirement groups assigned at the catalog and section levels.
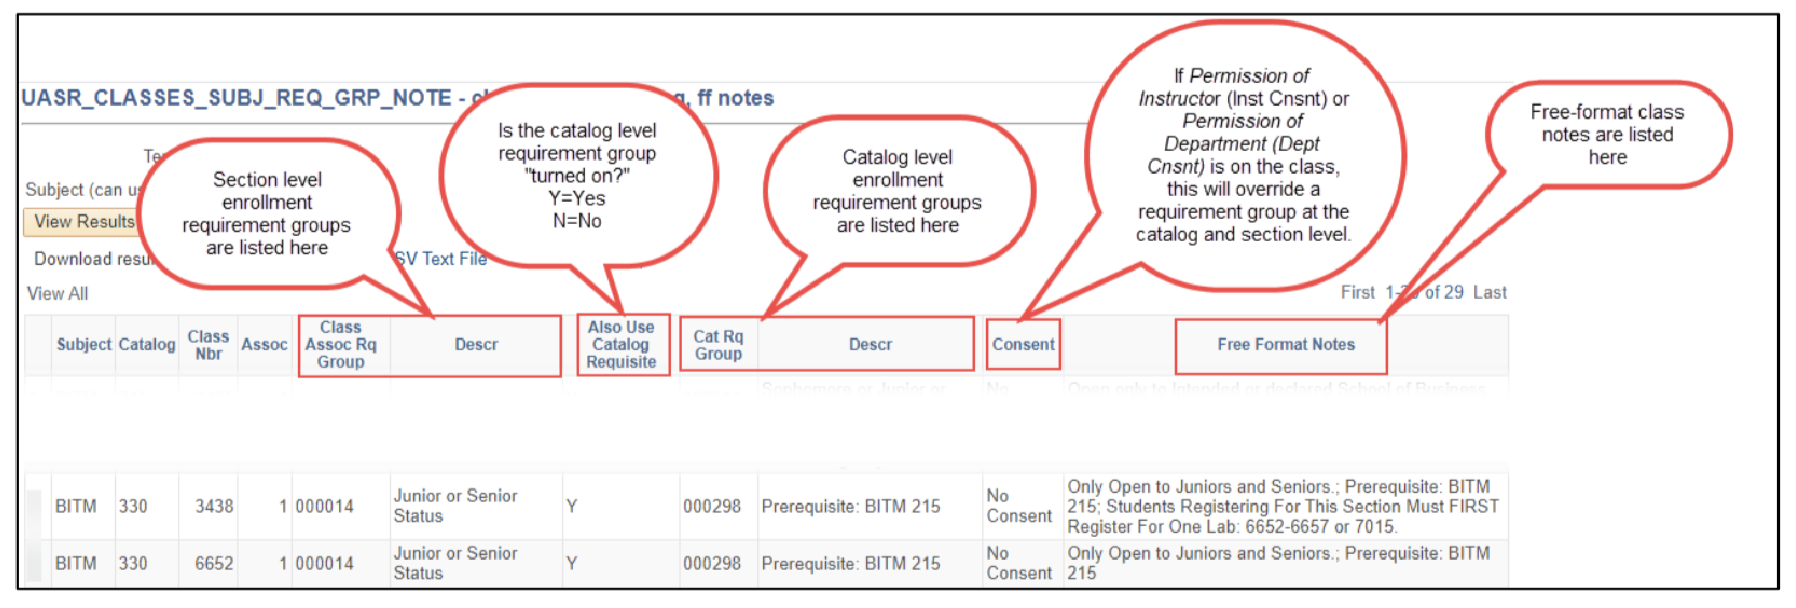
Note: This query does not include enrollment requirement groups at the reserve level. Please visit the Reserves section of this page for instructions.
Reserves
A reserve restricts class section enrollment, saving a certain number of seats within a particular section for the identified student population — as defined by the enrollment requirement group(s).
Reserves are rolled from like term to like term in the fall and spring semesters only. For example, all Fall 2021 reserves roll to Fall 2022. Any reserves added before the roll would be deleted. Please do not assign or adjust reserves for fall and spring semesters until notified by the Registrar's Office.
Winter and summer reserves don’t roll. Departments may add reserves for the winter and summer terms after the initial scheduling period is complete.
There are two types of reserves:
reserves
Academic Support Center Reserves
Academic Support Center Reserves
Academic Advising Reserves include enrollment requirement groups for freshmen, sophomores, transfer students, EOP students and Living-Learning Community residents.
Departments cannot adjust Academic Advising Reserves.
If you have questions about Academic Advising Reserves, please email Academic Advising Director, Kristin Swaney, at [email protected].
Departmental Reserves
Departmental Reserves
Departmental Reserves save seats for specific populations, as defined by enrollment requirement groups, that could be based on students’ major, minor or program, academic level, or any combination thereof.
Academic departments place and adjust Departmental Reserves on class sections. They should only update or change reserves managed by their specific departments.
Academic departments should review, verify and add all the Departmental Reserves for the fall and spring semesters after they are notified it is safe to do so by the Registrar's Office. Departments may add reserves for the winter and summer terms after the initial scheduling period is complete.
To identify the reserves on your department's class sections, log into PeopleSoft and run the following query: UASR_RESERVES_BY_SUBJECT
If you have questions about Departmental Reserves, please email the Registrar’s Office at [email protected].
Managing Departmental Reserves
Add a Reserve or Multiple Reserves
Add a Reserve or Multiple Reserves
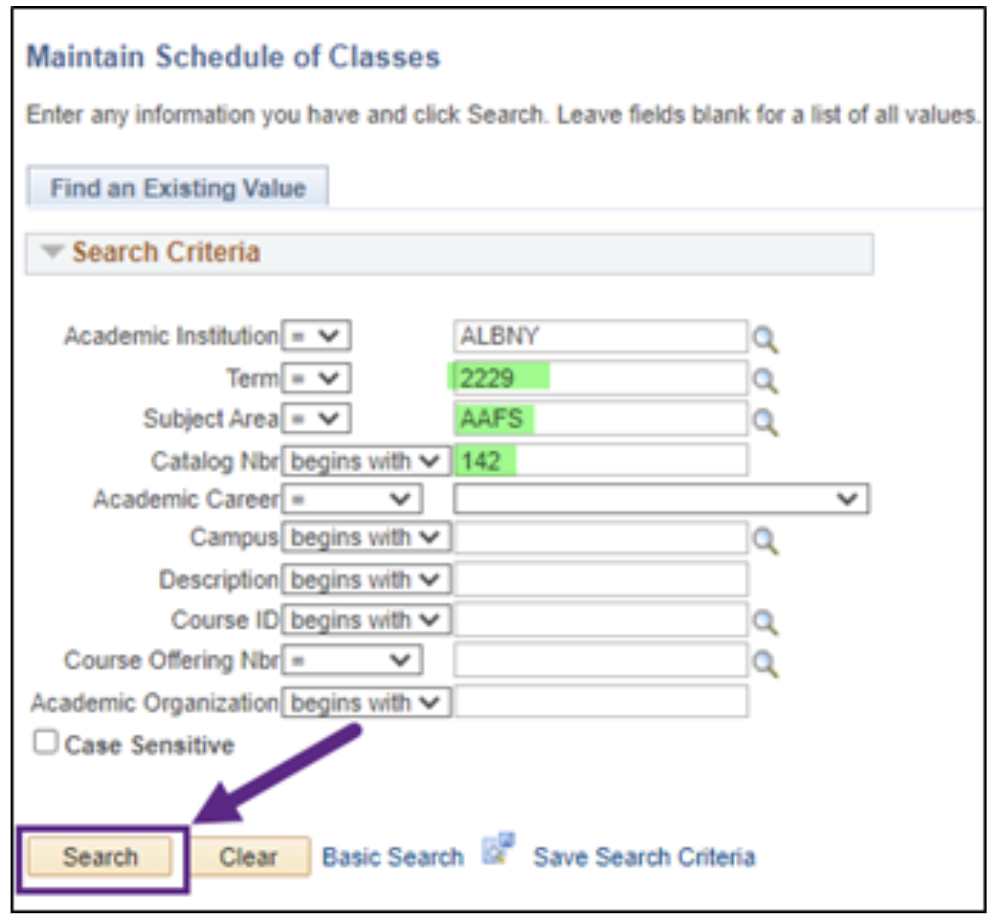
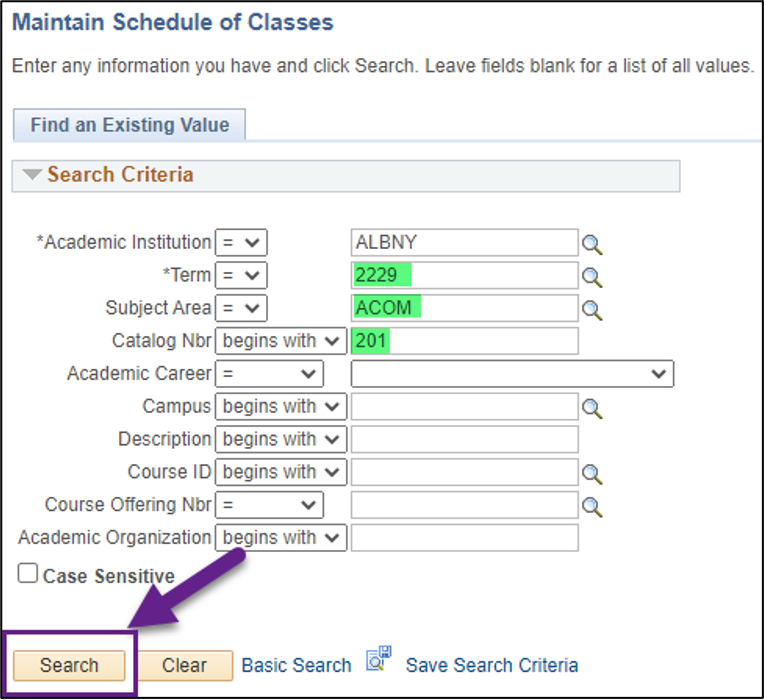
- Log into PeopleSoft. Then, use the Main Menu to navigate to “Maintain Schedule of Classes” (Your path will be “Curriculum Management,” then “Schedule of Classes,” then “Maintain Schedule of Classes”).
Enter the Term, Subject Area and Catalog Number. Select "Search."
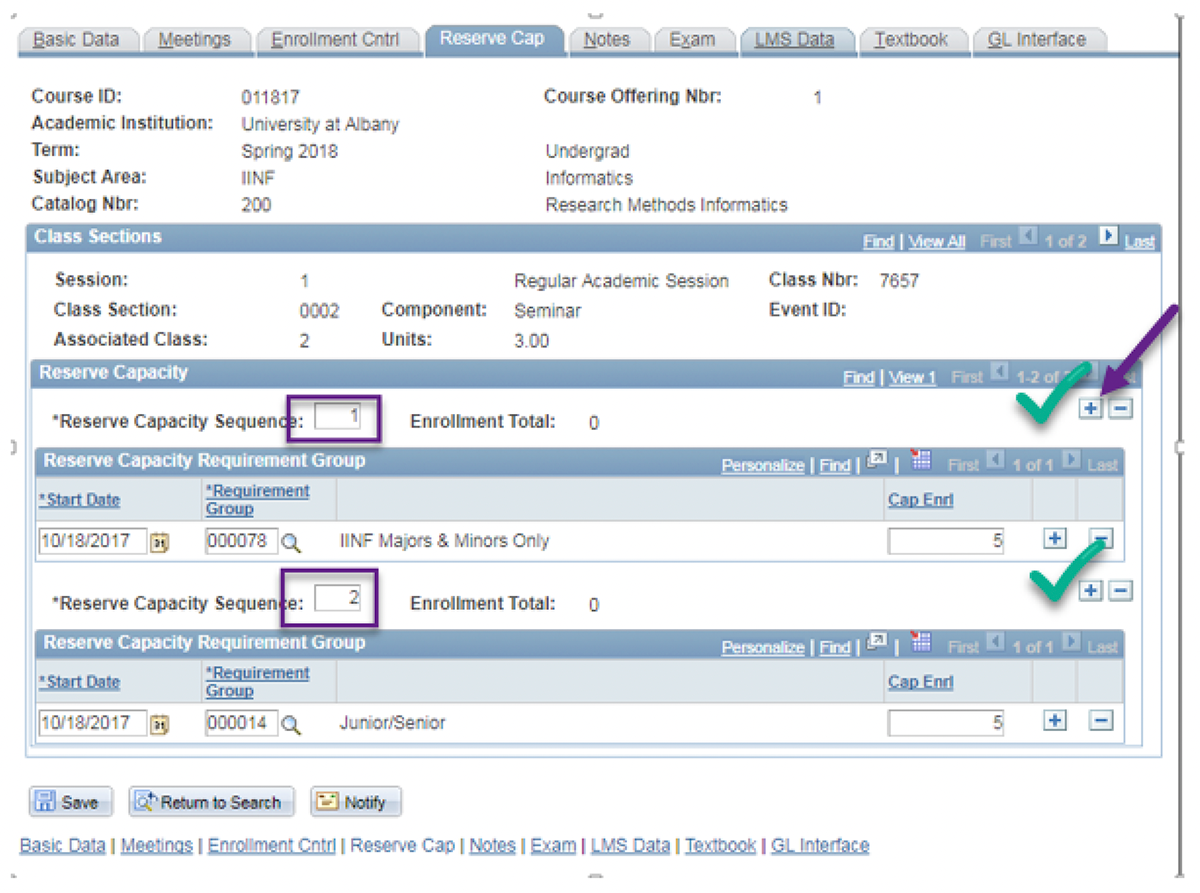
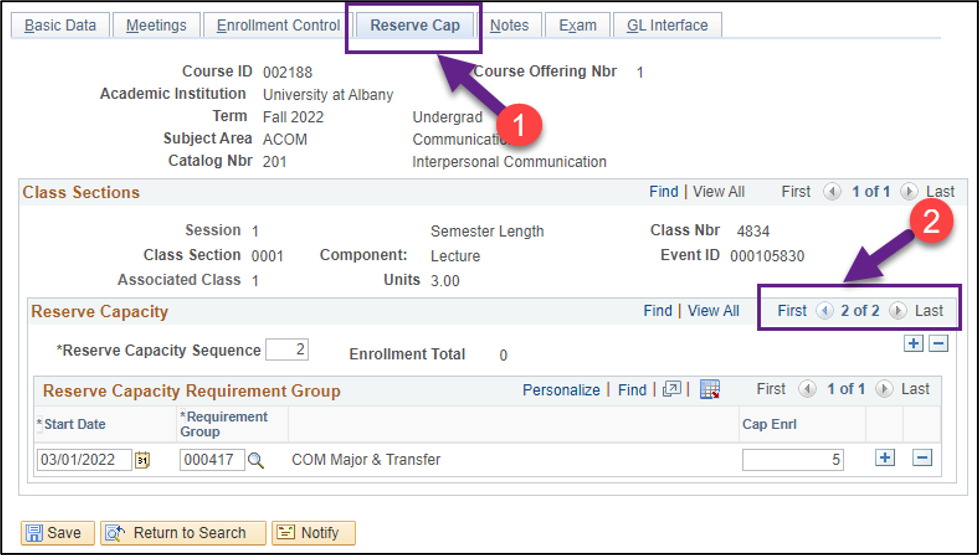
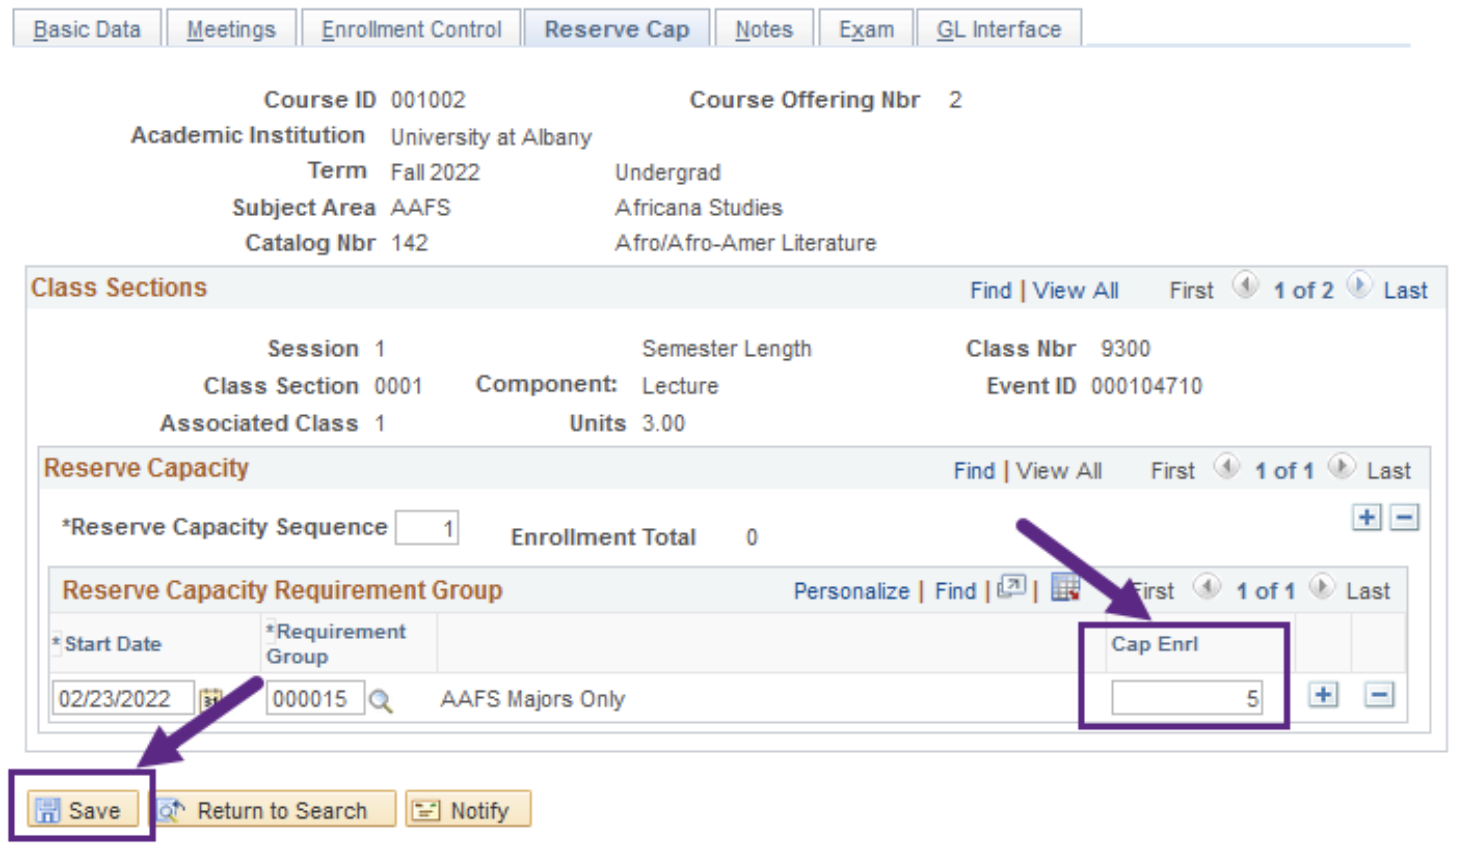
Use the scrolling arrows to navigate to the correct class number. Then, click the "Reserve Cap" tab.
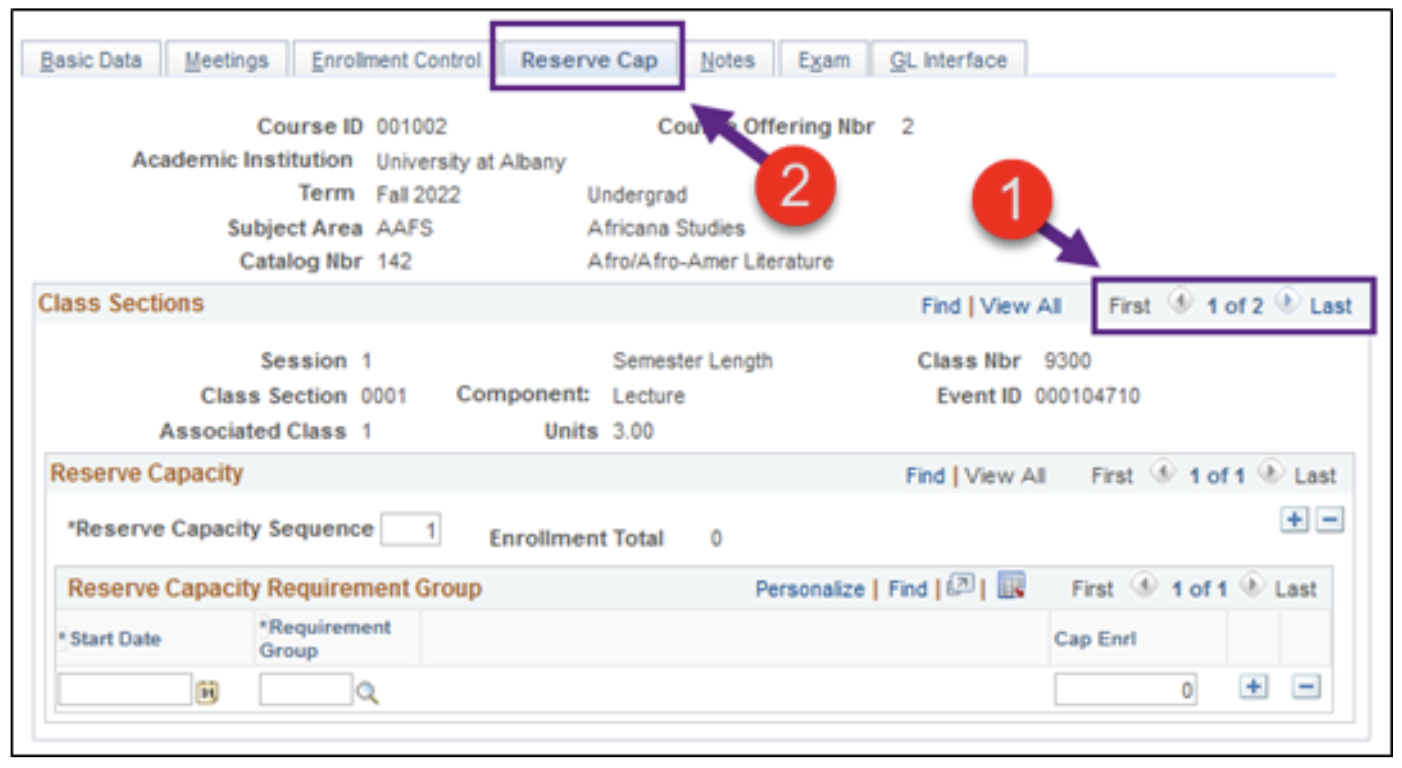
Enter the start date, the enrollment requirement group number and the number of seats you would like to reserve for this group. Note: Never enter 0 in the “Cap Enrl” field, as it will inactivate all reserves.
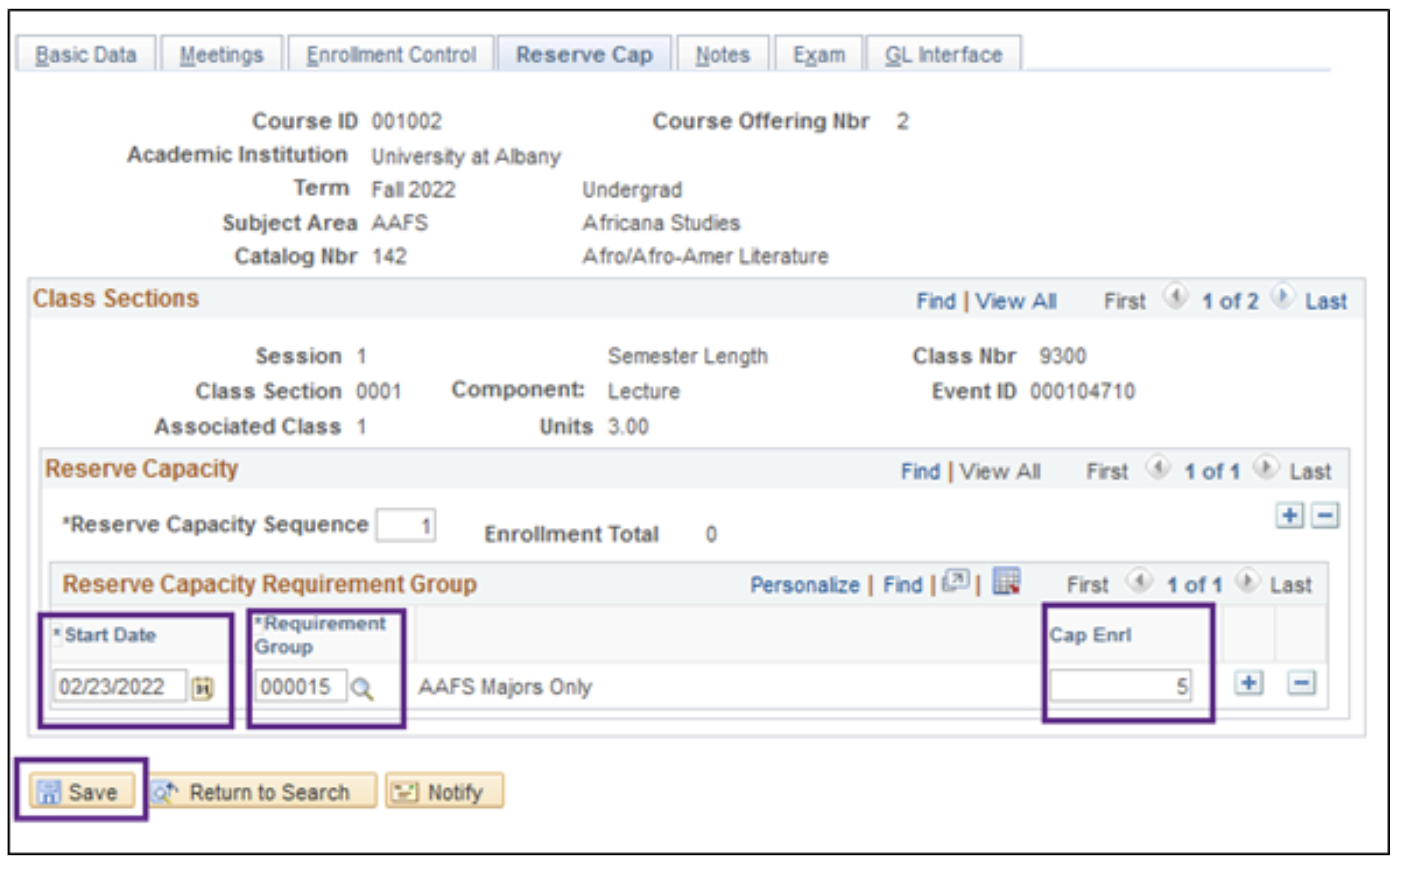
- Click “Save.”
To add another reserve to the same section, add a row to create an additional Reserve Capacity Sequence.
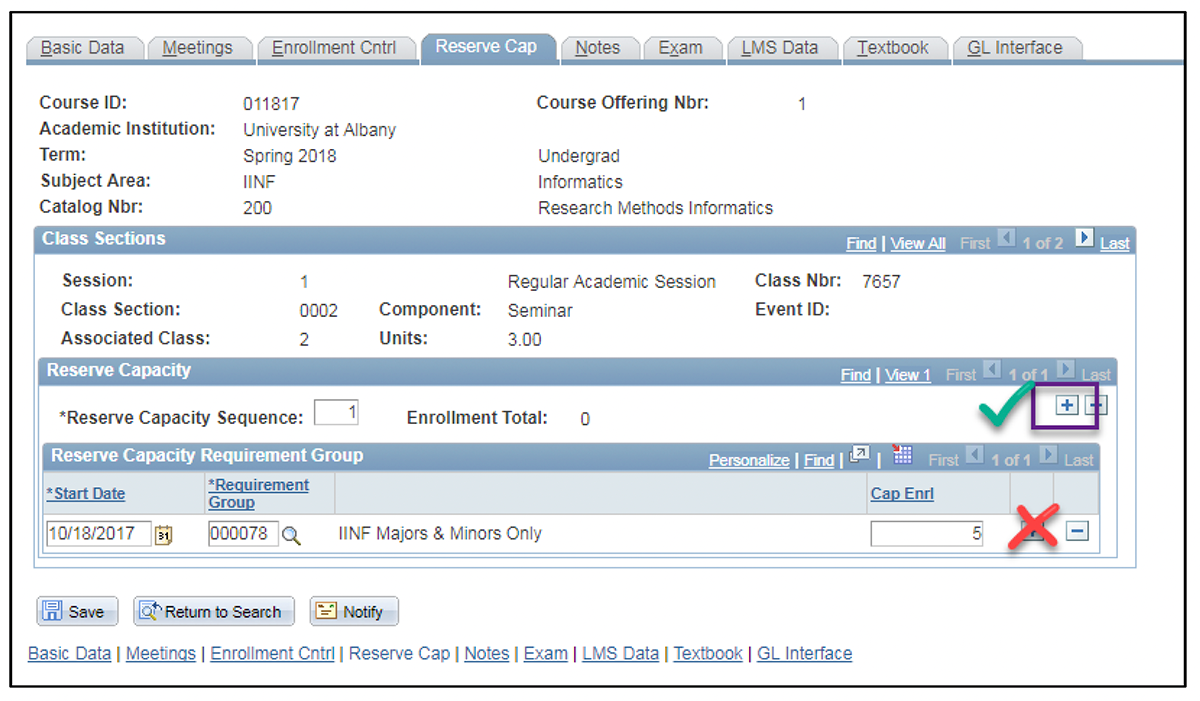
Don’t add the row to the Reserve Capacity Requirement Group block.
Each reserve should have its own Reserve Capacity Sequence Number.
Add Start & End Dates to a Reserve
Add Start & End Dates to a Reserve
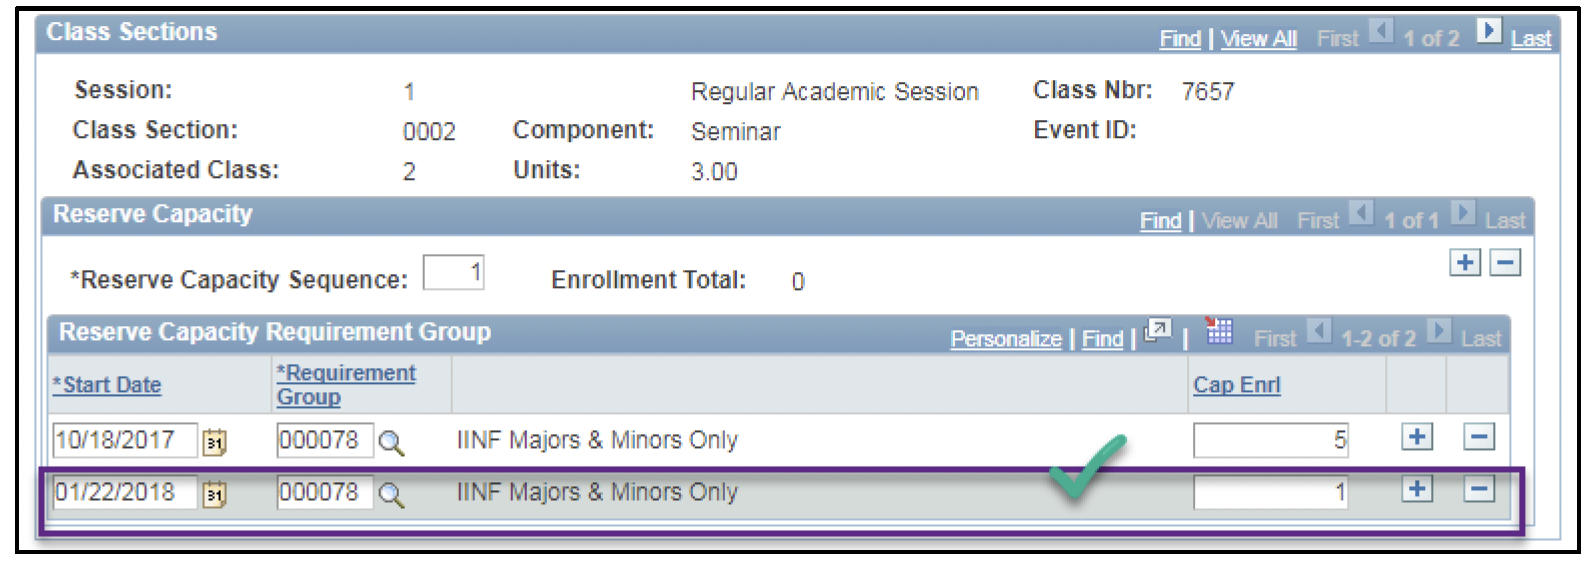
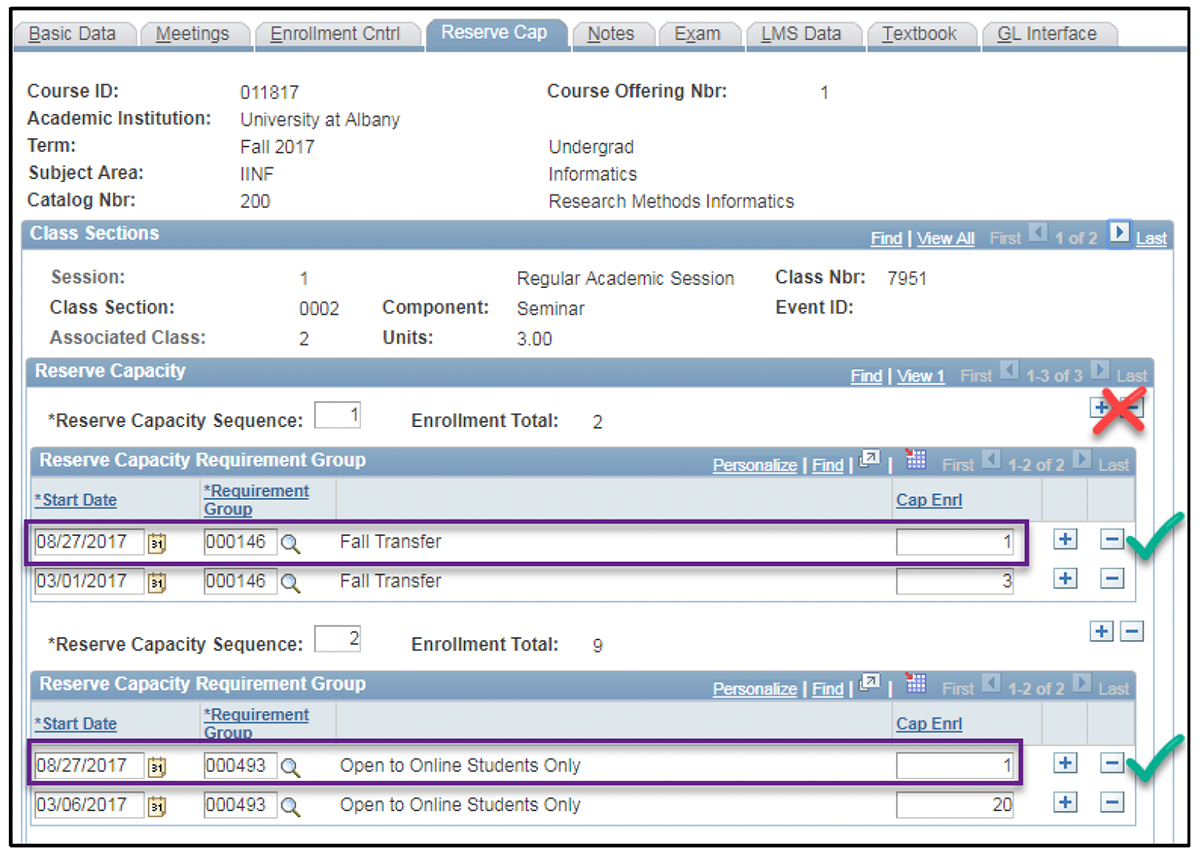
A reserve’s Start Date is the date the reserve will become effective.
Adding a second future dated row on the Reserve Capacity Sequence will amend (increase, decrease or end) that reserve, effective 12 a.m. (midnight) on the date listed in the Start Date Box.

Amending a reserve with a Cap Enrl = 1 will essentially end the reserve. This means it will allow students who did not meet the reserve criteria to enroll in the class if there are open seats. This will hold one seat in the reserve, but it is the only way to end the reserve on a specific date. Never enter 0 in the Cap Enrl Field. This will inactivate all reserves.
Academic Advising Reserves end the day before the semester begins.
To end a reserve on a specific date:
- Log into PeopleSoft. Then, use the Main Menu to navigate to “Maintain Schedule of Classes” (Your path will be “Curriculum Management,” then “Schedule of Classes,” then “Maintain Schedule of Classes”).
Enter the Term, Subject Area and Catalog Number. Select "Search."

Use the scrolling arrows to navigate to the correct class number. Then, click the "Reserve Cap" tab.

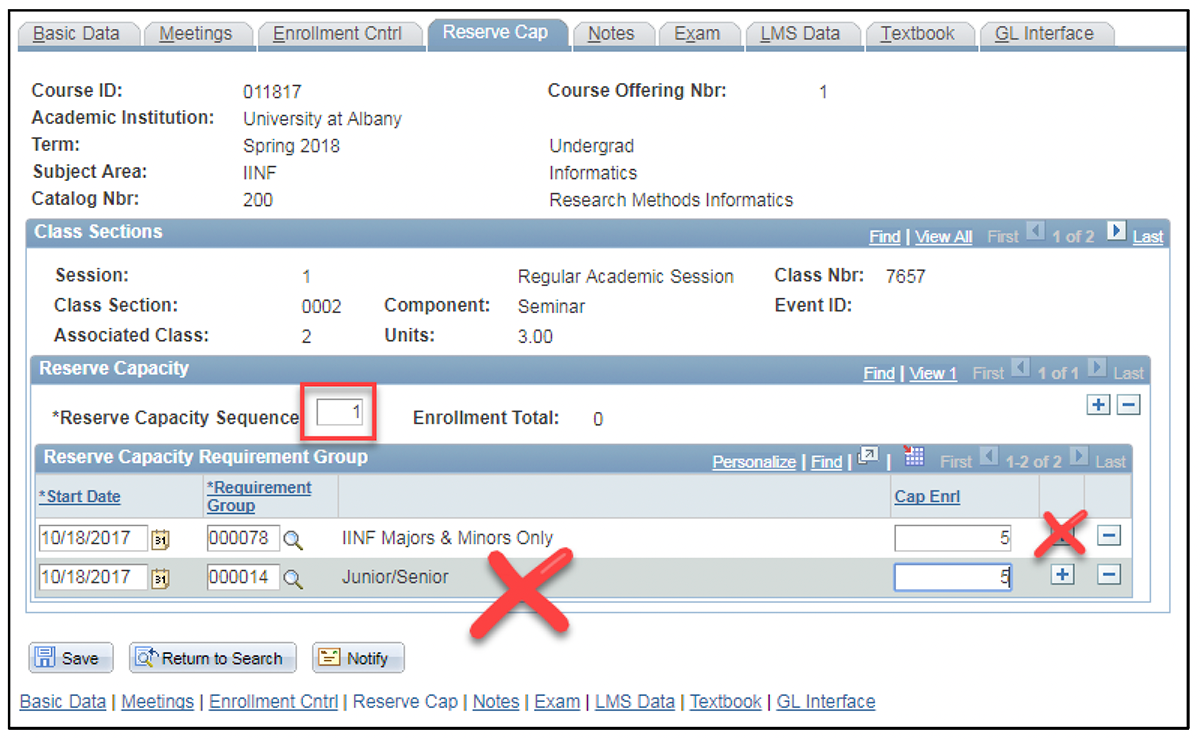
- Add a row on the Reserve Capacity Requirement Group block.
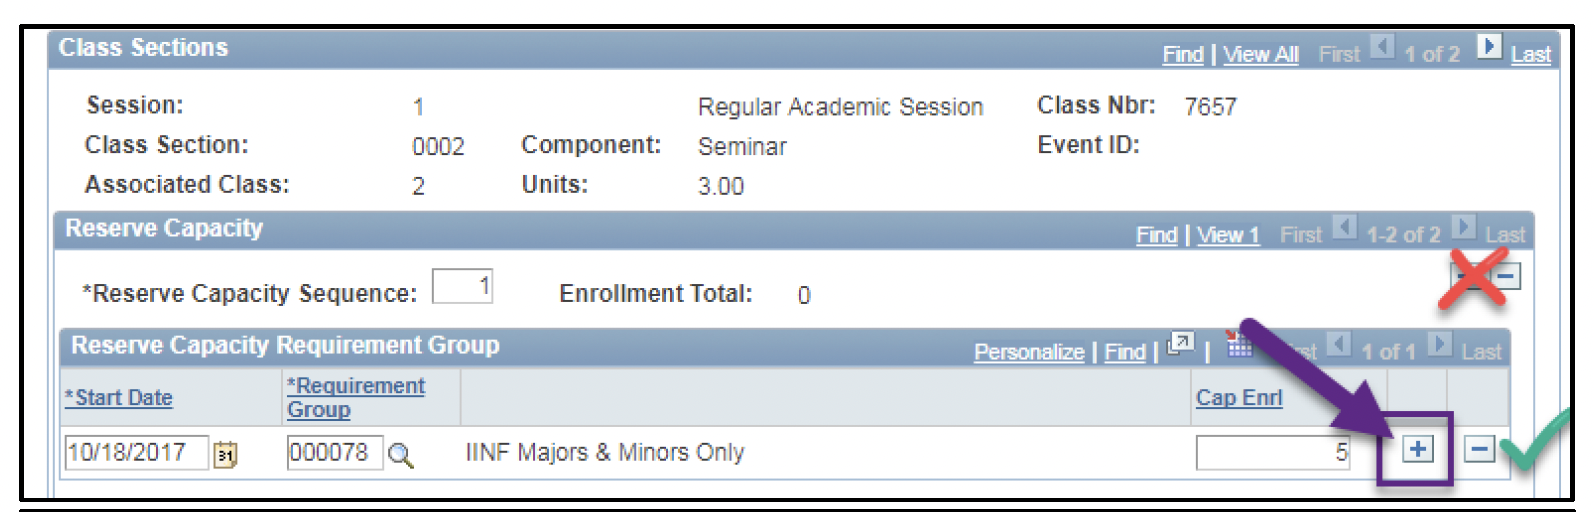
- Enter the requirement group number and add 1 in the “Cap Enrl” field.
Note: These rows are added on the same Reserve Capacity Sequence.
Remove a Reserve
Remove a Reserve
- Log into PeopleSoft. Then, use the Main Menu to navigate to “Maintain Schedule of Classes” (Your path will be “Curriculum Management,” then “Schedule of Classes,” then “Maintain Schedule of Classes”).
- Enter the Term, Subject Area and Catalog Number. Select "Search."
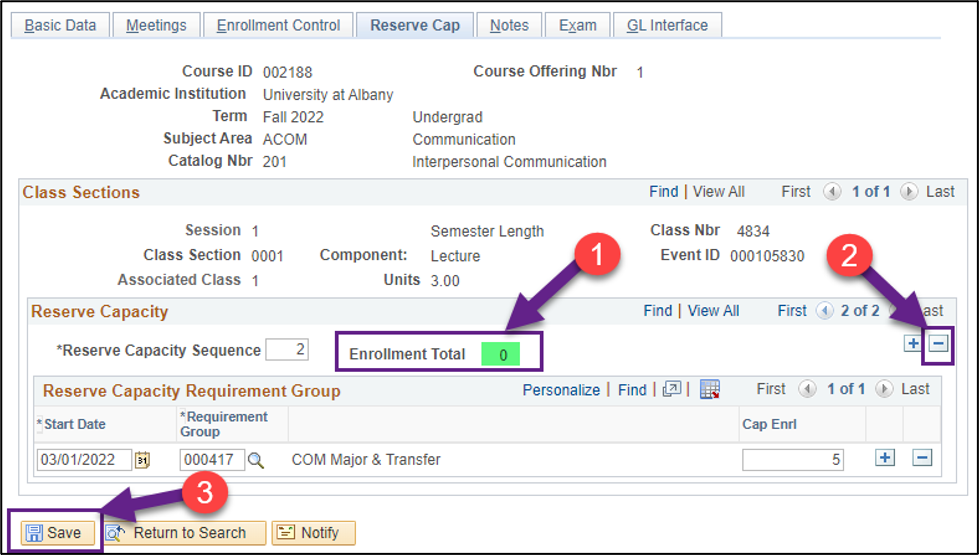
- Navigate to the “Reserve Cap” tab. Then use the scrolling arrows in the Reserve Capacity to navigate to the reserve you want to remove.
- If the Enrollment Total on the reserve you want to remove is zero, you may delete the Reserve Capacity Sequence row and then select “Save.”
- If there are students enrolled in the reserve you want to remove (the Enrollment Total is more than zero) you should change the start date on the existing row to the date after the last day to add a course with permission (visit the Academic Calendar for exact dates), then add 1 in the “Cap Enrl” field and then select “Save."
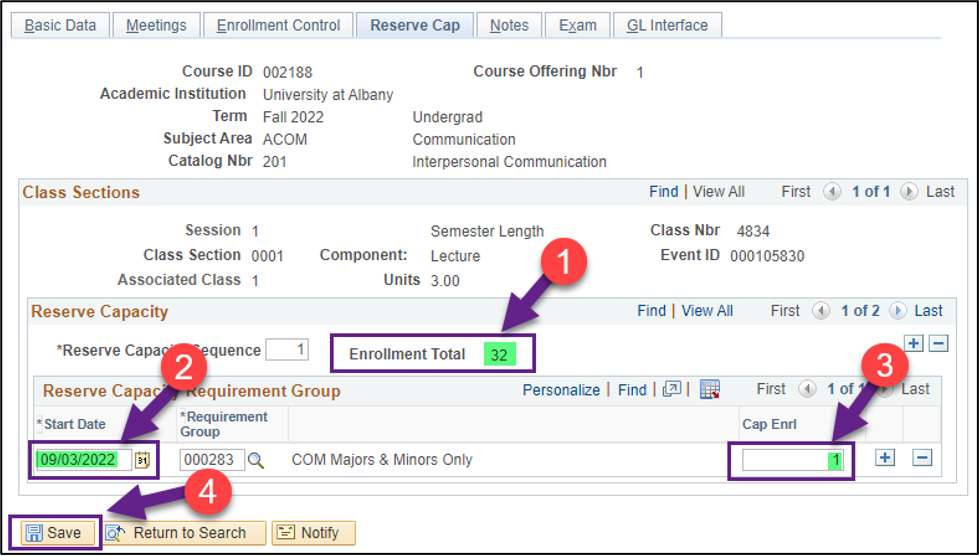
Never enter 0 in the “Cap Enrl” field, as it will inactivate all reserves.
Note: Deleted rows will not be rolled over to future fall and spring semesters.
Update a Reserve
Update a Reserve
You can update a reserve without dropping students from the class.
Before updating a reserve, ask yourself:
- Are there enough seats open to apply the number of seats being reserved?
- How does updating this reserve impact the other reserves and enrollment capacity assigned to the class?
If your reserve totals exceed the number of seats available in the class, the last reserve on the section will be omitted from the Schedule of Classes.
To update a reserve:
- Log into PeopleSoft. Then, use the Main Menu to navigate to “Maintain Schedule of Classes” (Your path will be “Curriculum Management,” then “Schedule of Classes,” then “Maintain Schedule of Classes”).
Enter the Term, Subject Area and Catalog Number. Select "Search."
Use the scrolling arrows to navigate to the correct class number. Then, click the "Reserve Cap" tab.
- On the "Reserve Capacity Requirement Group" block, enter the new number in the “Cap Enrl” field and then select “Save.”
Note: Never enter 0 in the “Cap Enrl” field, as it will inactivate all reserves on the section.
You should also consider the following when updating reserve capacities:
- What is the current reserve “Cap Enrl”?
- How many students are enrolled under the reserve?
- How many students are enrolled in the class?
- What is the total enrollment capacity?
- Are there other reserves on the section?
- Will you need to change other reserves as well?
- How will changing the reserve affect the number of open seats for any student?
Reserve enrollment totals show all students enrolled that meet the reserve requirement. This number includes students who meet the reserve criteria, even if they enrolled outside the reserve.
If enrollment exists and you need to add or change a reserve, please always account for all enrolled students so the reserve enrollment capacities don’t exceed the number of currently available seats.
If you add reserves to a section after enrollment begins, you’ll also need to periodically monitor the section’s enrollment to make sure all reserve caps and enrollment totals are balanced. Otherwise, a student may enroll in the class before the reserve is added; if that student then drops the class, it could leave seats open.
Enrollment into a class using class permission or setting a class to require instructor or department consent will override reserves and negatively affect reserve enrollment totals.