

Using Drupal to Edit University Websites
This is a quick reference guide for site editors using Drupal, UAlbany’s content management system (CMS).
If you don’t find what you’re looking for here or need some help, please submit a Web Services ticket. Our team is here to support you!
Note: Only trained faculty/staff site editors may access Drupal to edit the University website. Request training and access.
Account Management
Log In & Sign Out
Log In & Sign Out
Log into Drupal using your UAlbany NetID and password.
Note: If you ever try to log into Drupal but are instead routed to a webpage that says, “You are not authorized to access this page,” you are likely already signed in.
When you’re signed into Drupal and on an albany.edu webpage managed in Drupal, there will be Drupal menu options added to the page.
The menu at the top of your screen, located above the UAlbany logo, will include buttons labeled Manage, My Groups and your email address.

To sign out of Drupal, select your email address and then click Log out.
Navigate the My Groups page
Navigate the My Groups page
Once you log into Drupal, you’ll be brought to the My Groups page, which will list the Groups you have access to in Drupal.
Each website within the albany.edu domain has its own Group in Drupal. And each Group contains that particular website’s webpages, menu and editors.
For example, the Division of Student Affairs & Enrollment website is managed through the Division of Student Affairs & Enrollment Drupal Group.
Manage a Group
Manage a Group
To manage a specific Group in Drupal, go to your My Groups page and select the specific website’s name under the Group Name column.
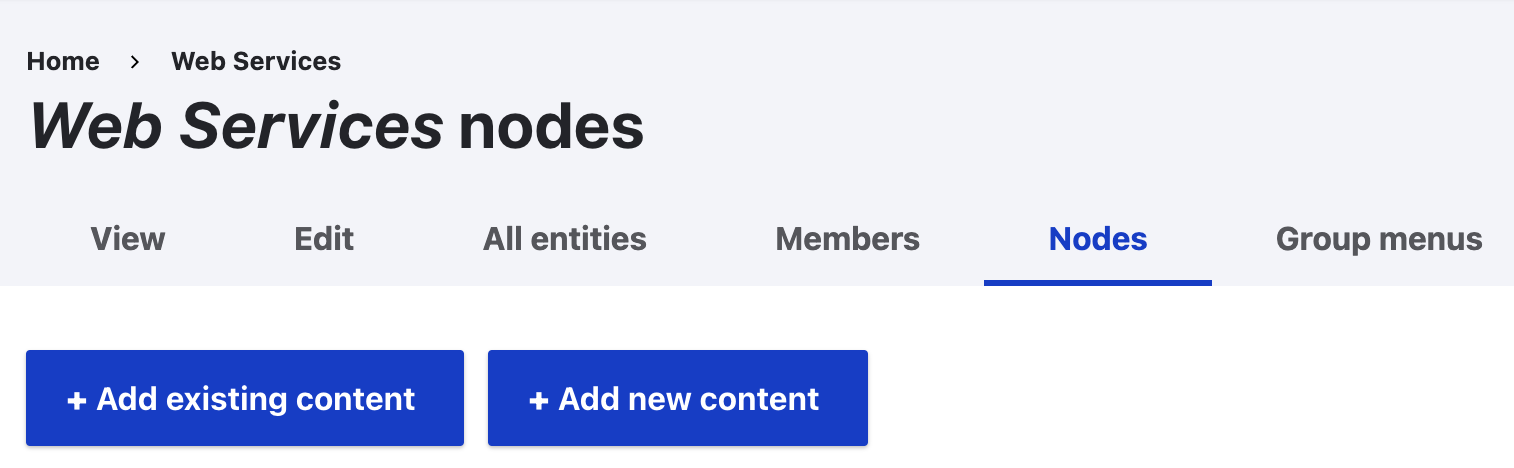
Two of the tabs on the Group page are relevant for site editors: Nodes and Group Menus.
- The Nodes tab lists all the webpages within the Drupal Group. It also enables you to create a new Basic Group Page or a new News Article.
- The Group Menus tab allows you to edit the website’s navigation menu.
For detailed instructions on how to complete these actions, please review the accordions below.
New Webpages
UAlbany’s webpages are built using Drupal templates, and most webpages use the Basic Group Page template. Other commonly used templates include Faculty/Staff Pages and News Articles.
Drupal is a WYSIWYG (what you see is what you get) editor, which means how text appears and the order in which content appears in the editing view is essentially how it will appear on the webpage.
Note: All site editors are responsible for ensuring the content they add to the University website is accessible to all users, including those with disabilities. Learn more about webpage accessibility.
Create a Basic Group Page
Create a Basic Group Page
Note on Adding New Webpages
We highly recommend site editors work with a Web Services staff member to create a new Basic Group Page.
Our team will ensure each new webpage adheres to UAlbany’s required accessibility, usability, editorial and brand standards.
Request a new webpage within an existing website.
Create a Basic Group Page
Go to your My Groups page and select the Create Basic Group Page link to the right of the appropriate Group’s name.

You’ll be routed to an empty Basic Group Page template and need to complete these steps:
- At the top of the page, add a Title. The field is the title of your page (Heading 1). It will appear both in the Title area of your browser tab as well as at the top left of the published page.
- Below the Title, add a Meta Description. For detailed instructions, please review the Add or Edit a Meta Description accordion.
- On the right, click Menu Settings and check the Provide Menu Link checkbox. Then, add the page’s Title to the Menu Link Title field and, using the Parent Link dropdown, select where within the site menu you’d like the page to appear.
- Note: If you don’t want the page to appear in the site’s navigation menu, you’ll need to edit the Group Menu after you publish the new webpage. For detailed instructions, please review the Edit a Group Menu accordion.
- Note: If you don’t want the page to appear in the site’s navigation menu, you’ll need to edit the Group Menu after you publish the new webpage. For detailed instructions, please review the Edit a Group Menu accordion.
- Scroll to the bottom of the webpage, where you’ll see Save as Draft. Click the blue Save button.
Once in Draft mode, you’ll be able to continue adding content to the webpage and save your work without giving users access to see it yet.
For detailed instructions on how to add and publish content, please review the Edit a Basic Group Page accordion.
Create a News Article
Create a News Article
- Go to your My Groups page and click the website’s name under the Group Name column.
- On the Nodes tab, click the Add New Content button.
- Click “Group node (News article).”
You’ll be routed to an empty News Article template and need to complete these steps:
- At the top of the page, add a Title. The field is the title of your News Article (Heading 1). It will appear both in the Title area of your browser tab as well as at the top of the published News Article.
- Below the Title, add a Summary. The Summary is the text that appears under the new article’s Title when it’s listed in a newsfeed on the website. The Summary should provide either an overview or a preview of the News Article’s content for the user.
- Scroll to the bottom of the webpage, where you’ll see Save as Draft. Click the blue Save button.
Once in Draft mode, you’ll be able to continue adding content to the News Article and save your work without giving users access to see it yet.
For detailed instructions on how to add and publish content, please review the Edit a News Article accordion.
Request a New Faculty/Staff Page
Request a New Faculty/Staff Page
Site editors are not able to make new Faculty/Staff Pages (Person Pages) in Drupal. You must submit a Web Services ticket to request a new Faculty/Staff Page.
Request a Single-page Subsite
Request a Single-page Subsite
Single-page Subsites are a type of webpage where the content is contained in one webpage, but content is divided up into navigable tabs. Those tabs will appear in one of two ways:
- Stand Alone Subsites exist by themselves, so their tabs appear as a navigation menu on the left side of the page, like the menus that appear on regular UAlbany websites. (For example: Graduate Student Association)
- Site Component Subsites exist within a regular UAlbany website, so their tabs appear in a row at the top of the website while the affiliated unit’s navigation menu appears on the left side of the page. (For example: Center for Human Services Research)
Subsites are often used to build small standalone websites or to add research sites within school or college websites.
Site editors are not able to create new Single-page Subsites in Drupal. To create a new Single-page Subsite, you must submit a Web Services ticket to request a new web project.
Existing Web Content
Note: All site editors are responsible for ensuring the website content they edit is accessible to all users, including those with disabilities. Learn more about webpage accessibility.
Edit a Group Menu
Edit a Group Menu
Note on Editing Group Menus
We highly recommend site editors work with a Web Services staff member when making major changes to existing websites, such as adding new webpages or changing the menu. Review navigation menu best practices.
Our team will ensure each new webpage adheres to UAlbany’s required accessibility, usability, editorial and brand standards. Request help with editing an existing website.
Edit a Group Menu
To edit a Group Menu, please first follow these instructions:
- Go to your My Groups page and click the website’s name under the Group Name column.
- Click the Group Menus tab.
- Click the menu’s name.
From here, you can make changes to your website’s navigation menu.
- Show/Hide Menu Items: Select or de-select the checkbox next to each webpage’s name to show or hide that webpage from the navigation menu.
- Move Menu Items: Using either row weights or the drag-and-drop function, you can move menu items’ order and nesting.
You must scroll to the bottom of the page and click the Save button to save and publish any changes to the menu.
Edit a Basic Group Page
Edit a Basic Group Page
Note on Making Major Edits
We highly recommend site editors work with a Web Services staff member when making major changes to existing webpages, such as adding entirely new sections of content.
Our team will ensure each new webpage adheres to UAlbany’s required accessibility, usability, editorial and brand standards. Request help with editing an existing webpage.
Edit a Basic Group Page
The easiest way to access a webpage for editing is to sign into Drupal, navigate to that webpage and then click the Edit button on the left side of the page.
Required fields will already be filled. For additional information, review the accordions above.
The following fields also automatically appear on all Basic Group Page editing views but are not required:
- The Subtitle field will appear just below the title in the upper grey area of the page.
- The Body field is where most of your main page content will go and will appear in the main area of the page, just to the right of the left navigation.
Below the Body field, you also have the option to edit or add different types of Paragraphs to the webpage.
Paragraphs are pre-designed features in Drupal that allow you to easily build and display more dynamic content, such as accordions, video embeds and photo sliders.
- Paragraphs will appear directly below the Body area and to the left of the navigation menu.
- Full Width Paragraphs will appear directly below Paragraphs and span the full webpage width.
- Sidebar Content will appear directly below the navigation menu on the left side of the webpage.
To see examples of what each Paragraph type looks like, please visit our example webpages:
Edit a News Article
Edit a News Article
The easiest way to access a News Article for editing is to sign into Drupal, navigate to that webpage and then click the Edit button on the left side of the page.
The required fields will already be filled. For additional information, review the accordions above.
The following fields also automatically appear on all News Article editing views but are not required:
- The Body field is where your News Article’s text will go. This will appear in the main area of the page, just to the right of the left navigation.
- The Publication Date field helps sort News Articles into chronological order (newest to oldest) when they appear in a news listing. You should set the Start Date and End Date to the desired date of publication. Both fields should always show the same date, except in very special circumstances.
- The Main Image field displays a single image or a single video at the top of the News Article. It will also populate the thumbnail in a news listing, unless the Alternative Image field is populated. Please see the Add or Update Photos accordion for image best practices.
- The Alternative Image field (which you must click open) allows you to add a different image than the Main Image. If the Alternative Image field is populated, that image will appear on news listings and the Main Image will only appear at the top of the News Article.
- The Tagging / Categorization field allows you to add a Department tag, which is how you get a News Article to appear in a particular news listing. These tags are most often your office or department’s name. Disregard the Categories and Tags, which are only used by News Center.
- The URL Controls field allows you to create a simple announcement or to link offsite.
- When the No Hyperlink box is checked, the News Article will appear in news listings, but the title and image will not be hyperlinked. Select this for simple announcements that need not link to a stand-alone page.
- When the Link to Other Webpage field is filled, the News Article and its summary will appear in news listings, but the title and image will link to the other webpage URL you provide. Use this feature to highlight external news coverage without violating the outlet’s copyrighted content.
Below these fields, you also have the option to edit or add different types of Paragraphs to the News Article.
Paragraphs are pre-designed features in Drupal that allow you to easily build and display more dynamic content, such as accordions, video embeds and photo sliders.
- Inline Paragraphs will appear directly below the Body area and to the left of the navigation menu.
- Sidebar Content will appear directly below the navigation menu on the left side of the webpage.
To see examples of what each Paragraph type looks like, please visit the Paragraphs with Sidebar Example webpage.
Edit a Faculty/Staff Page
Edit a Faculty/Staff Page
Note on Department Directories
Each faculty and staff member at UAlbany may have only one Faculty/Staff Page, which should encompass all their roles and responsibilities at the University.
Faculty/Staff Pages are then added to different websites’ faculty and staff lists using the Department Directory paragraph and the Department Directory with Filter paragraph on Basic Group Pages.
These paragraphs dynamically list a preview of all Faculty/Staff Pages tagged to appear there. These paragraphs are typically set up by Web Services, since site editors are unable to create Department tags.
Request help with editing an existing webpage.
Edit a Faculty/Staff Page
The easiest way to access a Faculty/Staff Page for editing is to sign into Drupal, navigate to that webpage and then click the Edit button on the left side of the page.
The various fields that appear in the editing view for all Faculty/Staff Pages (Person Pages) information populate the various sections of those pages. The Title field is the only required field on the page.
Any fields without content will not be displayed on the published page, with two exceptions. The About and Contact headings will appear, even if those sections and their fields are left blank. For that reason, we recommend completing these fields.
At the top of the page, there is a gray box with basic information about the person. The fields that populate this section include:
- Title: The required field lists the person’s full name and is the title of your page (Heading 1). It will appear both in the Title area of your browser tab as well as at the top of the published page.
- Alpha Sort: This field is used to sort individuals alphabetically by last name in a directory. If the person’s name is John Smith, the Alpha Sort field should read smithjohn.
- Position Title: This field is the person’s professional title.
- Department: The Department field allows Faculty/Staff pages to appear on directories. See note on directories above for more information. If the Display Department field is left blank, the units added to the Department field will also display on the Faculty/Staff page.
- Display Department: Units added to this field will appear on the Faculty/Staff Page without affecting tagging.
- Resume/CV: This field allows you to upload the person’s resume or CV as a PDF. The file must be 512MB or less. Drupal will host the PDF and automatically create an accessible link for it on the page. For example, if the person’s name is John Smith, the link will read “John Smith – CV.”
- Portrait: This field is used to add a headshot or professional portrait.
- Web Services recommends files smaller than 1MB to preserve page load speed. Images must be larger than 267 by 250 pixels and must be one of the following file types: JPG, JPEG, PNG or GIF.
- The image will be rendered as a square. Once you upload the photo, move the crosshair on the preview to select the focal point of the image.
- You must also add alternative (alt) text. Web Services recommends simply adding the person’s name with a period at the end (for example: “John Smith.”). Learn more about alt text.
Next, there is the Contact section, which includes the following fields:
- Email: Please use the person’s UAlbany email address.
- Secondary Office Description: If the person has two offices on campus, you may use this field to describe the secondary office (such as Lab, Administrative Office, Secondary Office, etc.).
- Office Location: This is the person’s primary office location on campus. Please include the building name and room number.
- Secondary Office Location: This is the person’s secondary office location on campus, if applicable. Please include the building name and room number.
- Phone: This is the person’s primary campus phone number.
- Secondary Phone: This is the person’s secondary campus phone number, if applicable.
- Office Hours: This field can be used to list a faculty member’s academic office hours.
The Education section includes one field, which allows you to add the person’s educational details to the page. The University’s editorial style for this field is “degree type, degree area, institution, year graduated.” For example: “PhD, Mechanical Engineering, Rutgers University, 1996.”
The About section includes the following fields:
- About: Use this field to provide a brief bio or overview of the person and their role at UAlbany.
- Summary: To access the Summary field, you must click the Edit Summary link next to About. Use the Summary field to provide a summary of the person and their role. The Summary will not appear on the Faculty/Staff Page, but it will appear with the person’s name on a directory if the paragraph is set up to display summaries. See note on directories above for more information.
- Related University Organization: If the person is involved in a UAlbany organization (such as a lab, faculty group or other entity) that isn’t listed in another field on the page, list that organization here.
The Research section includes the following fields:
- Center/Institute/Lab name and URL: These fields allow you to add a link to a faculty member’s center, institute or lab. If you add the entity’s URL to the URL box and the entity’s name to the Link Text box, Drupal will add an accessible link with that information to the page.
- Google Scholar URL: This field allows you to add a link to the faculty member’s Google Scholar page. If you add the URL to the URL box, Drupal will add an accessible link to the page.
- Research Interests, Grants/Funding, Publications, Patents and Talks & Presentations: These fields create an accordion of that title under the Research heading. Whatever content you put in the field will populate the body of that accordion. If you use headings inside the accordions, please use Heading 4 (H4).
The Instruction & Advising section includes the following fields:
- Courses and Teaching Statement: These fields create an accordion of that title under the Instruction & Advising heading. Whatever content you put in the field will populate the body of that accordion. If you use headings inside the accordions, please use Heading 4 (H4).
The Additional Information section includes the following fields:
- Awards & Honors, Service and In the News: These fields create an accordion of that title under the Research heading. Whatever content you put in the field will populate the body of that accordion. If you use headings inside the accordions, please use Heading 4 (H4). For the In the News section, please link to relevant UAlbany and external news coverage using descriptive linking.
Lastly, there are two additional fields at the bottom of the Faculty/Staff Page’s editing view:
- Personal Website: These fields allow you to display a website’s name and URL on a directory listing (such as a lab site). The content from these fields will not appear on the Faculty/Staff Page.
- Tags: This field is used for the Department Directory with Tag paragraph. See note on directories above for more information.
Edit a Single-page Subsite
Edit a Single-page Subsite
Note on Making Major Edits
We highly recommend site editors work with a Web Services staff member when making major changes to existing Subsites, such as adding entirely new tabs or new sections of content.
Our team will ensure each new webpage adheres to UAlbany’s required accessibility, usability, editorial and brand standards. Request help with editing an existing Subsite.
Edit a Single-page Subsite
The easiest way to access a Subsite for editing is to sign into Drupal, navigate to that webpage and then click the Edit button on the left side of the page.
Three sections automatically appear on all Single-page Subsite editing views.
The Basics section includes following fields:
- Title: This is the title of your Subsite (Heading 1) and a required field. It will appear both in the Title area of your browser tab as well as at the top left of the published Subsite.
- Meta Description: This is a required field. For detailed instructions, please review the Add or Edit a Meta Description accordion.
- Subtitle: This is an optional field. It will appear just below the title.
The Pages section includes the Subsite’s content, separated out into pages (tabs). Two sections automatically appear on each page:
- Page Title: This is the page title and a required field. It will appear at the top of the page as a Heading 2. If the Page Menu Title field is not filled, it will also appear as the tab name.
- Page Menu Title: This is the title of your tab and an optional field. If left blank, the Page Title field will be used.
Below those fields, you will have the option to edit or add different types of Paragraphs to the webpage.
Paragraphs are pre-designed features in Drupal that allow you to easily build and display more dynamic content, such as accordions, video embeds and photo sliders.
To see examples of what each Paragraph type looks like, please visit the Paragraphs with Sidebar Example webpage.
The Hero section is only relevant for Subsites with a hero image (a large photo that appears across the entire top of the page). Please see the Add or Update Photos accordion for image best practices.
Additional Considerations
Save, Publish, Archive & Delete Webpages
Save, Publish, Archive & Delete Webpages
Save & Publish New Webpages
When you create a new webpage, whether it’s a Basic Group Page or a News Article, and are ready to save it, scroll to the bottom of the editing view. The Save button is just below a dropdown menu with two Moderation State options:
- Save As Draft: Your changes will be saved and any site editors with access to your Group will be able to see the content, but the content won’t be accessible to the public yet. This option is the default selection for new pages.
- Save as Published: Your changes will be saved, and the content will be accessible to the public.
If you Save as Draft, the page will appear on your screen with a pink hue and a Moderation State box will appear near the top. Click the Apply button to publish the page when you’re ready.
Publish, Archive & Delete Existing Webpages
Once a page has been saved, its Current State will be listed above the Save button. The dropdown menu will now show three Moderation State options:
- Change to Published: Your changes will be saved and accessible to the public. This option is the default selection for pages in Published State.
- Change to Draft: Your changes will be saved and any site editors with access to your Group will be able to see your changes, but the changes won’t be accessible to the public yet. This option is the default selection for pages in Archived State.
- Only one draft may be saved and edited at a time. To see the draft, navigate to the webpage and click the Latest Version button on the left side of the screen. To see what users can see, click View.
- Change to Archived: Your changes will be saved and any site editors with access to your Group will be able to see your changes, but the entire webpage will be hidden from public view.
- When a webpage is in Archived State, users will receive a 404: Page Not Found error message when they try to visit the page. To avoid this, please request a redirect.
- If you change a webpage back to a Published State after requesting a redirect, you must notify Web Services. If we don’t remove the redirect, users will not be able to access the republished webpage.
You will also have a Preview button and a Delete button next to the Save button.
- Preview: This will allow you to preview changes before saving them. (Closing the browser window or hitting the back button could cause you to lose your changes.)
- Delete: If you click the delete button, you’ll be asked if you’re sure you want to delete the page. If you select Delete again, the page will be permanently deleted. (If you plan to republish the webpage’s content in the future, use the archive feature instead.)
- Once a page is deleted, users will receive a 404: Page Not Found error message when they try to visit the page. To avoid this, please request a redirect.
Format Text Properly
Format Text Properly
Always clear formatting from text before you paste it into Drupal:
- On a Mac, right click and select Paste & Match Style anytime you paste content into Drupal.
- On a PC, right click and select Paste as Plain Text anytime you paste content into Drupal.
Web Services highly recommends using a plain text editor, such as TextEdit on a Mac or Notepad on a PC, to scrape formatting off text before you paste it into Drupal.
You’ll need to add back any links, headings, bolding and/or italicizing using the Drupal tool bar once you’ve pasted the content in.
If your content includes a table, you must build the table in Drupal and then add the correct information to each cell.
Add or Update Photos
Add or Update Photos
To use an image on the website, UAlbany must either own the copyright of a photo or have express permission from the photo’s copyright owner.
Additionally, if a student’s face is recognizable in a photo, the image can only be used on the University website if Digital Media has a signed release form on file for that student. Photos with signed release forms are tagged “release” in the University’s photo database.
If you’d like to add or update a photo on an existing webpage, Web Services can:
- Provide photo options that are approved for website use
- Resize photos to less than 1MB to ensure they won’t affect the website’s load time (the slower the page loads, the lower it ranks in search results)
Add or Update Web Documents
Add or Update Web Documents
Please visit the SharePoint for Web Documents webpage for information on how documents are hosted and shared on the UAlbany website, including instructions for creating a shareable link for a web document.
Note: All site editors are responsible for ensuring the web documents they upload are accessible to all users, including those with disabilities. Learn more about making accessible web documents.
Add or Edit a Meta Description
Add or Edit a Meta Description
What is a meta description?
A meta description is a concise summary of a webpage's content that often appears on search engine result pages, tailored to match the user's search terms.
For example, if you Google “UAlbany transcript,” the first result includes the following meta description, “Access your unofficial UAlbany transcript. Order an official UAlbany transcript and check your order status. Get a transcript notarized or Apostilled.”
Meta descriptions are required for all Drupal webpages. They are limited to 150 characters, including spaces.
As a site editor, you’ll be prompted to add a meta description when you create a new webpage and when you edit an existing webpage that doesn’t yet have a meta description.
If you have any questions or need further assistance, feel free to ask Web Services for help.
Why are meta descriptions important?
Improving your meta descriptions can drive more traffic to your web content.
Meta descriptions help users understand what a page is about as they search for content and decide which links to click. Clear, helpful meta descriptions engage users and make them more likely to click your link.
Note: Search engines often use the meta descriptions we provide but not always. For example, Google provides a “snippet” based on the user’s search terms.
What makes a good meta description?
Consider these best practices as you write meta descriptions:
- Be descriptive and specific. Clearly describe what the page is about. Avoid vague language and ensure the description accurately reflects the content.
- Use Calls-to-Action (CTAs). Encourage users to click on your link by using active language, such as “Learn more about...” or “Discover...”, to describe what they can accomplish by visiting your webpage.
- Make it unique. Each page should have a unique meta description to help users discern the differences between each of your webpages.
- Use keywords naturally. Consider users’ most likely search terms and include them in your meta description. Avoid overloading your meta description with keywords, since this reduces effectiveness.
Using AI Tools to Help Write Meta Descriptions
Artificial intelligence (AI) tools, such as Microsoft Copilot, can also be helpful as you craft meta descriptions.
We recommend using a prompt such as, “Write a meta description for the following webpage in 150 characters or less, including spaces, and without the use of Oxford commas: [insert webpage URL here].”
However, AI is no replacement for human editors. It’s imperative you review and edit anything an AI tool creates to ensure it is accurate, appropriate and adheres to UAlbany’s web standards.
Meta Description Examples
| Webpage | Examples | Explanation |
|---|---|---|
| Executive Council webpage, About UAlbany website | Poor Meta Description: UAlbany leadership Good Meta Description: The president’s Executive Council includes the vice presidents and other senior level direct reports. View contact information for the council members. | The poor example isn’t a full sentence and doesn’t provide the user with detailed information on the webpage’s content. The good example is specific and provides a clear call-to-action. |
| Campus Tours & Events webpage, Undergraduate Admissions website | Poor Meta Description: Take a campus tour. Good Meta Description: Visit our beautiful Uptown Campus and experience a UAlbany student-led tour or explore a variety of other visit options on campus. Explore campus tours. | The poor example is barebones and doesn’t include keywords such as Uptown Campus or UAlbany. The good example includes both and entices users to learn more by hinting at a variety of options. |
| Department of Anthropology homepage, Department of Anthropology website | Poor Meta Description: Anthropology is the study of humankind, of ancient and modern people and their ways of living. It seeks to understand the whole panorama — in geographic space and evolutionary time — of human existence. Good Meta Description: Study the rich cultural diversity of humanity with a degree in anthropology. Learn more about the Department of Anthropology at the University at Albany. | The poor example is accurate, but it isn’t specific to UAlbany and doesn’t help distinguish our content and how it can be used. The good example uses active language and keywords to explain what a user can expect if they visit this website’s homepage. |
| Enroll in a Payment Plan webpage, Cost & Aid website | Poor Meta Description: Cost & Aid webpage on payment plans. Good Meta Description: We developed an E-Payment Plan to help students and families meet financial obligations while attending UAlbany. Explore payment plans and enroll today. | The poor example does not provide the user with any new information, since they'll be able to see the webpage and website names along with the meta description in the search results. The good example provides a welcoming and actionable explanation of what the payment plan accomplishes and for whom. |
| Grants & Training webpage, Division of Inclusive Excellence website | Poor Meta Description: Diversity, Inclusion, Grants, Awards, Applications, Training Good Meta Description: The Division of Inclusive Excellence invites proposals for strengthening, promoting and embracing diversity and inclusion at UAlbany. Get started. | The poor example is an example of keyword stuffing. Don’t write meta descriptions for the search algorithm. Write them for the human users. The good example is a full sentence that provides a succinct overview of the webpage’s content. |
| Shenglong Zhang Lab subsite, Department of Chemistry website | Poor Meta Description: Professor Shenglong Zhang’s laboratory website. Good Meta Description: The Zhang Lab is dedicated to studying the role of RNA modifications, the next scientific frontier. | The poor example is correct but lacks details. The good example explains what kind of research the professor’s lab engages in, encouraging interested users to click the link so they can learn more. |