How to Upload and Add a New Photo
Photos can be added to your web page using the Text Editor. Below are step-by-step instructions to upload and add a new photo that is on your computer or network drive.
|
Photo Notes: Photos must be RGB images in order to upload them to RedDot and display in a web browser. CMYK images are intended for printing and will not import into RedDot. Check the image mode in your photo editing program prior to uploading. Free Photoshop Classes: |
The example below shows how to add a new photo (that is not in the Asset Manager yet) within the Body Text in the center content area of the web page.
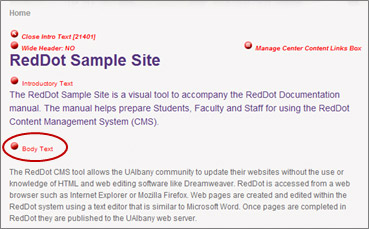
- Click on the Open Intro Text red dot in the center content area. This will reveal the red dots for the editable areas in the center of the page.

- Click on the Body Text red dot. This will open the Text Editor window displaying the text you already entered in the Body Text area.
- In the Text Editor, place your cursor next to the text where you want to add the photo.
- Click on the Insert Image icon from the toolbar in the Text Editor.
 This will open the Insert Image window.

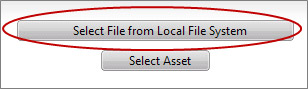
- Click on the Select button on the far right of the screen. This will open the Upload or Choose File window.

- Click on the button for Select File from Local File System. This will open the Upload window.
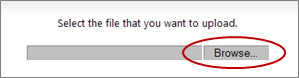
- Click the Browse button from the Upload window. This will open the Choose File to Upload window.
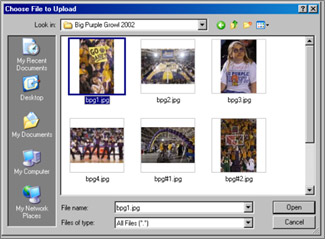
- Navigate to the location where the image file is stored on your computer or network drive.
- Select the file and double click the file name (or single click to highlight and click the Open button). This will bring you back to the Upload window. The file path to the image should be displayed in the field to the left of the Browse button.
- Click the Upload button in the Upload window. This will bring up the Asset Manager window displaying a list of sites.

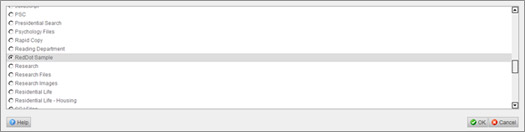
- Scroll down the list sites until you find yours. Click the radio button next to your site's name. This will save the photo in the Asset Manager for your site.
- Click the OK button on the lower right. This will bring you back to the Insert Image window.
- In the Alternative text field type in a description of the photo. This text will provide information about the photo to visitors who are visually impaired and using screen-reader software.

- In the Alignment field click the dropdown arrow and select where you would like the photo to be displayed relative to the text. If you want the photo to the right of the text select "Right" from the dropdown menu.

- Click the OK button on the lower right. This will bring you back to the Text Editor window. Your photo should now be displayed next to the text.

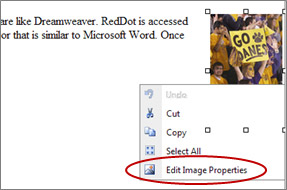
- To change the alignment and alt text, right click on the photo and select Edit Image Properties from the menu. This will open the Edit Image window.
- Make any changes and click the OK button on the lower right. This will bring you back to the Text Editor window.
- Click the OK button in the lower right of the Text Editor window. This will bring you back to the SmartEdit window. You should now see your photo next to the Body Text.

- You are done adding the photo and can publish the page piece.
